I mentioned this in my original post, but working with wood is not my forte in general. I would never have thought to strip a piece of furniture or even paint a piece of furniture many years ago. But there was someone in my life who introduced me to paint and varnish stripper. This was my first husband. He was a very driven individual. He was a Marine and a general badass. You will always have reasons as to why you have an “ex-anything” in your life. My reasons are too deeply personal to reveal at this time, but the important thing for this post is to tell you about my first experience with stripping and refinishing an antique desk.
I lived in New Mexico at the time and my husband introduced me to auctions and flea markets. I had been to thrift stores off and on over the years but never looked at buying used furniture and certainly not antiques. We were in need of a dresser. We had just gotten married and I moved to New Mexico to be with him, not really contributing to bringing any furniture into our new home.
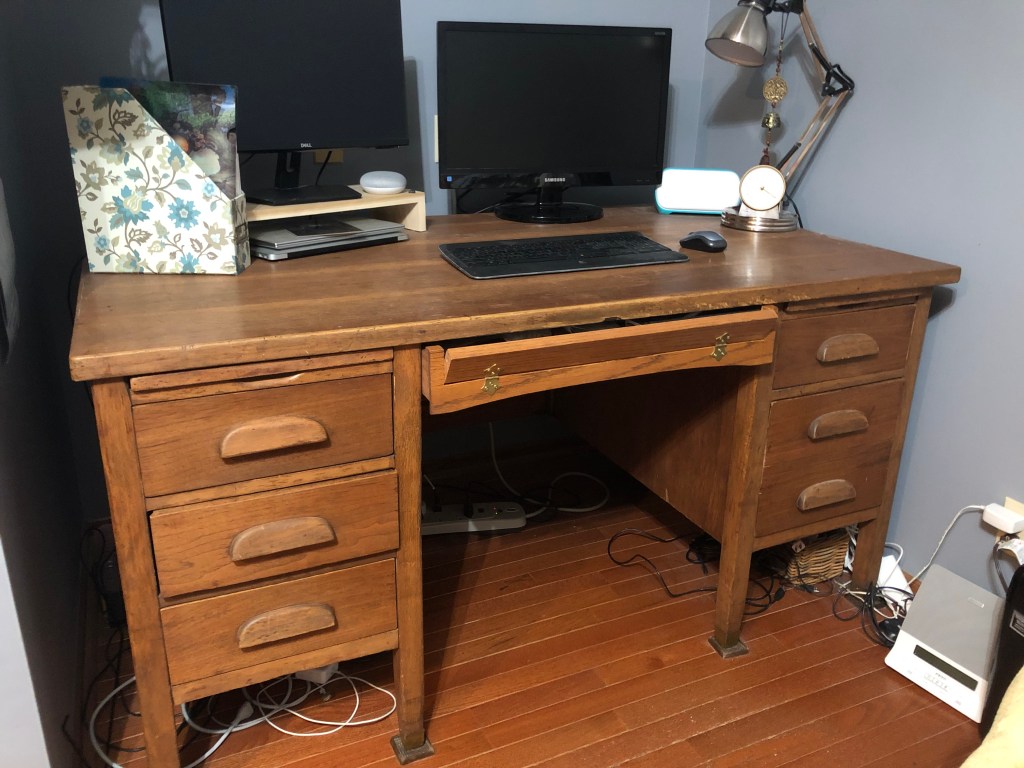
We attended an auction one evening that had many different types of furniture, including beds, dressers, tables, and desks. We purchased a beautiful antique dresser that had a piece of marble for the top, an attached mirror, and inlayed burlwood on the drawers. This was my first introduction to burlwood. I have always been attracted to the look of burlwood with its swirls of color and various patterns in the woodgrain. An old teacher’s desk was also auctioned that evening. It was solid oak. It was a bit beat up, with some water stains on the top, a couple of cigarette burns, and a missing main middle drawer. It had some paint and some varnish on it. The desk was heavy, sturdy, and was inexpensive, as I believe we paid less than $20 for it. Now I have seen this same type of desk in antique stores for around $400.
I do not have any photos of the desk during the refinishing process. Or if I had taken any at the time, it would have been on a camera that I no longer have. This was prior to iPhones and any heavy usage of internet. I don’t think we even had internet at our house at the time. I can tell you, though, that I still own this desk today and because of all of the work I put into refinishing it I have not been able to part with it even though it would have been easier to not move it all over the country!
My husband basically sat the desk up in the garage and gave me paint or varnish stripper. I had no idea what I was doing, but he showed me how to apply it, wait a bit, and then strip the old paint and varnish with a scraper. This process went on and on for days, maybe even weeks. The desk is very large and I had to also do all the drawer fronts. The top, with its water stains and cigarette burns needed multiple coats of varnish remover. While I was working on this, we decided we needed to have someone build a front middle drawer to complete the look of the desk. We took what we could to a local antique dealer and he gave us a name of someone who would build an oak drawer to match. (Many years later I would have my dad cut into this middle drawer so I could install hinges to allow the drawer front to open. This allowed me to place a computer keyboard there and use it as a pull out so it was more ergonomically friendly.)
When I was finally done stripping it as best as I could, it was time to sand. At the time we did not have an electric sander, so I sanded the entire desk by hand. This was not fun. It was dusty and very time-consuming. This is when I learned about the different grits of sandpaper. The grits are numbers assigned to sandpaper to let you know how course or rough the sandpaper is. The lower the grit, the more course the sandpaper. When you sand wood that has been refinished you typically will use a more course paper first to get most of the “gunk” off of the wood. Later you sand with a finer sandpaper grit as it will allow the wood to be more smooth and appear to be a bit more sealed or refined when you are done.
Once sanding is done, you can use something like tack cloth to wipe the wood down. Tack cloth will grab all of the tiny particles and allow you to really wipe the wood down so there is no debris left behind. You want to wipe the wood down so that those particles are not on the surface when you go to paint or stain the wood. Those particles will get stuck into the paint or new varnish and then all of your prep work and sanding will have been for nothing.
Stain can be applied by a cloth or with a paintbrush and then later wiped off to take any excess off of the wood. You do not want stain sitting on wood for very long. If it dries, then it becomes a sticky mess.
Once this whole process was done, my desk looked pretty good! I say “pretty good” and not “fantastic” because let’s face it, it’s an old desk and there are some imperfections that are better left untouched to leave the authenticity of the piece. I would have tried to make it perfect, but the local antique dealer that we had gotten to know told me that every piece of furniture has a story to tell. I have used that desk for years now and there are many stories I could tell you about where it’s been, who has sat at it, and what was created while sitting at that desk. There may be a day when I get too tired to move it. It’s heavy, awkward, and a general pain to haul or move. But I know how long it took me to refinish it. It is also a reminder of my past life and although sometimes painful to think about, is a story that is all mine.

One response to “My first refinishing project”
Love the story behind your desk Michele! As well as your teaching me to finish furniture!!:) Thank you so much! Absolutely love the piece you did for me. I will get you back one of these days, months or years:) You deserve something nice to come your way too:)
LikeLike